Fermented Vegetables
 It is very easy to make fermented vegetables. For hundreds of years – maybe thousands – people all over the world have made cultured foods part of their diet. We find sauerkraut in Germany, kimchi in Korea. natto and miso from Japan as well as pickles, yogurt, kefir, cheese and many other varieties from all over the world. Back in the days when there were no refrigerators, people’s survival depended on a way to preserve foods. Fermenting foods was a way to accomplish this.
The health benefits from cultured foods comes from live microorganisms, which the human body incorporates as gut bacteria. Healthy gut bacteria is necessary to help fend off bad bacteria. Too many foods in today’s world is lacking in good bacteria. If we don’t consume regular amounts of good bacteria, we are essentially giving the bad bacteria the advantage in our bodies.
This is a delicious recipe adapted from the Dr, Mercola website:
http://articles.mercola.com/sites/articles/archive/2013/06/01/fermented-vegetables.aspx
There are a few differences with this recipe from the one at the Mercola site. We are using a different culture and we are only making 4.5 lbs (the amount recommended for one packet of culture). We can only refrigerate and go through so many quarts of vegetables at a time so we only make 4 jars each batch. There are also some variations in the vegetables and this recipe uses sea salt in the brine.
Fermented Vegetables:
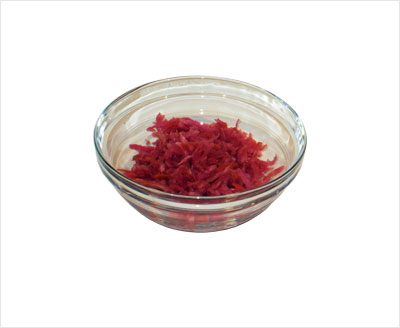
- 4.5 lbs vegetables:
- 1/2 head red cabbage
- 1/2 head green cabbage
- Optional 1/2 head of Asian cabbage
- 1/2 large golden beet
- 1 medium turnip
- 1 tart, green apple – Granny Smith or Fuji
- 1/2 large sweet potato
- 2-3 medium carrots
- 1/2 bunch radishes (about 5 medium radishes)
- 1 habanero pepper
- 2 thumb-sized pieces of ginger, peeled and shredded
- 3 cloves garlic
- 16 oz celery juice (best if juiced from fresh celery)
- 1 packet commercially available vegetable starter culture (such as Caldwell’s) or powdered probiotics or cultured brine from previous batch
- Sea salt
- You will also need:
- 4 wide mouth Mason jars with lids and bands
- Large mixing bowl
- Food processor with shredding blade
- Kraut pounder
WATCH VIDEO
Directions
Juice the celery with a juicer, then set aside to allow it to come to room temperature. Wash the vegetables, then peel and shred the ginger with a grater. Finely chop with a chef’s knife and then add it to the bowl. I like to slice the cabbage by hand with a chef’s knife because I want a more homemade texture. First slice the half-heads into quarters and then peel off the large outer leaves from two of the quarters and then cut each of these into halves. Set aside these 4 pieces for later. They will be used to cover the shredded vegetables in each of the Mason jars (see the Dr. Mercola video).
Thinly slice each of the cabbage quarters and add to the bowl. Peel the carrots, sweet potato, beet, turnip, and garlic, then peel and core the apple. Cut the fruit and vegetables into smaller pieces so they fit into the food processor feed tube and pusher. Shred all the fruit and vegetables with the food processor and then add to the bowl.
Starter
Note: Temperature is very important when working with any live culture. I keep starter packets in the refrigerator for keeping long term. The starter packet needs to be activated at room temperature in water. If using brine from a previous batch I will keep it in a jar in the refrigerator until ready for use, then I will set it on the counter ahead of time to allow it to come up to room temperature.
If the water comes from the refrigerator, allow it to come to room temperature before adding the culture or probiotics. Filtered tap water may be okay but it may also be hard on the live culture because it can contain trace amounts of chlorine or other harmful chemicals. To be safe, use bottled spring water or distilled water. If you are using probiotics or a starter packet of culture add it to 8 oz of water. Read the instructions for the commercial starter culture packet. For example, Caldwell’s says to “let the solution to sit for 8 to 10 minutes but no longer.”
Brine
If using a starter culture or probiotics, add 3 tablespoons of sea salt to the celery juice. Stir to dissolve. If using brine from a previous batch, pour it into a measuing cup and then fill the remainder up to the one cup line with water. You will be adding salt to the celery juice in proportion to the amount of brine used. Normally there will be 3 tablespoons of salt per 2 cups of celery juice plus 1 cup of water – that’s 1 tablespoon of salt per cup of brine. When using brine from a previous batch you can use as little as 1 tablespoon of brine per quart of vegetables. A 4.5 lb batch of vegetables will require four 1-quart jars. To be sure, I like to use about 1/2 cup of brine for the batch. That’s about twice as much as the minimum. There will be 1/2 tbsp of salt in the 1/2 cup of brine (remember, one cup of brine contains 1 tbsp of salt), so I will add 2 1/2 tbsp of salt to the 2 cups of celery juice to make up the difference.
Mix Everything Together
Pour the 8 oz of water with the culture or brine from previous batch into the bowl of shredded vegetables along with the 16 oz of celery juice with the added salt. Mix thoroughly with clean hands or vinyl gloves if sensitive to hot habanero pepper. The habanero can be painful or make your hands feel as big as a basketball. Mix everything very thoroughly and break up any bunching to make sure the culture and the brine gets distributed evenly throughout.
Packing the Jars
Use wide mouth one-quart Mason jars with lids and bands. Pack each jar with vegetables and then distribute the remaining brine equally into the jars. Each handful of shredded vegetables will have varying amounts of brine. Try to get the brine and vegetables as evenly distributed as you can. Use a kraut pounder to mash the vegetables down tightly into the jars (again, please refer to the Dr. Mercola video). Personally, I don’t have a kraut pounder, but I do have a Mojito muddler, so that worked okay for me. Finally, place one of the cabbage leaves that was set aside and mash it down firmly. Screw on each lid but not too tightly. The microorganisms give off a lot of carbon dioxide when they grow and reproduce so you have to give them some breathing room. A lot of pressure can build up if the lids are on too tight. You don’t want the jars to burst.
Note: I like to leave a little air space at the top of each jar to give some room for the culture to expand. The first batch I made foamed all over the place.
Fermentation
Place the packed jars in a camping cooler and allow to ferment for a week. The cooler helps to keep the fermentation at a constant temperature. Refrigerate the jars after a week. It will be ready to eat but it will continue to age for 6 to 8 weeks and the taste will mature.
Ready to eat after 7 days fermentation
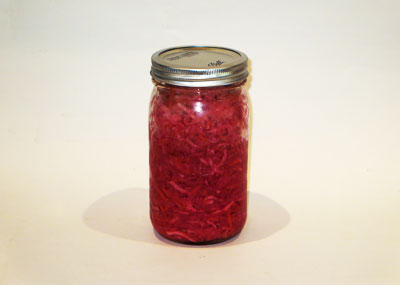
Delicious and with a spicy zing!